Try This Antirheumatic Yoga Series for Gentle Joint Support
March 27, 2024
Content created for the Bezzy community and sponsored by our partners. Learn More

LanaStock/Getty Images
Pawanmuktasana, or antirheumatic yoga, focuses on releasing excess ‘wind’ from your joints. These detailed instructions from a qualified yoga teacher may help you find some relief.
I’ve been a yoga teacher since 2007 and have practiced and taught a number of different styles depending on my preferences and the needs of my students.
Out of all of them, one style stands out as both the most accessible and profound in supporting my overall well-being.
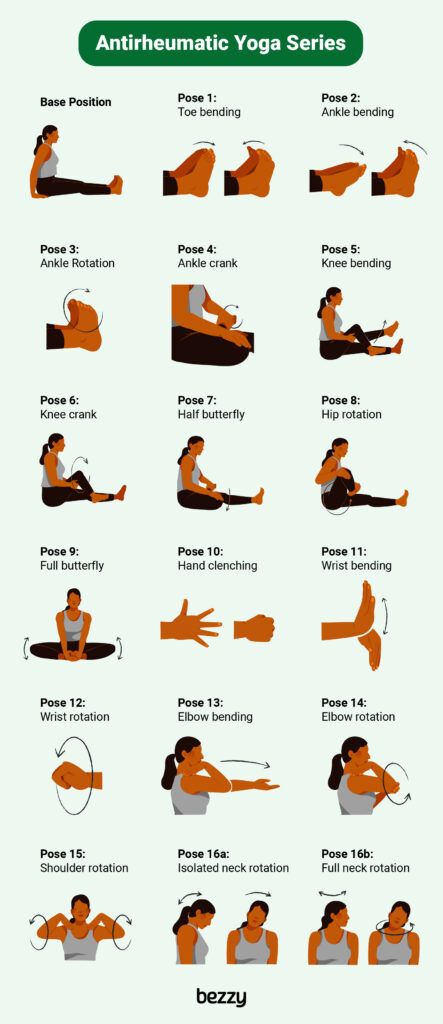
Known as the “Pawanmuktasana Series 1” in Sanskrit or the “Antirheumatic Yoga Series” in English, this simple sequence of 16 postures is designed to soothe the mind and nerves — and increase mobility in the joints.
Practiced seated, these poses have been a balm for me when dealing with stress, and they can help bring relief from stiffness and pain as well.
Read on to learn how to practice and gain the benefits of this style of yoga.


What is pawanmuktasana or antirheumatic yoga?
The word “Pawanmuktasana” translates from Sanskrit to “wind-relieving pose.”
In Western medicine, we may understand wind as relating to abdominal gas or bloating. In Ayurvedic medicine, the sister science of yoga, wind relates to movement. It infers more about your overall well-being, especially the connection of your mind and body to help release wind — not only from the digestive tract but also from your joints.
Excess wind can result in a number of symptoms, from cracking and popping joints to an overactive mind that just won’t settle down.
In the case of those cracking, popping joints, the presence of inflammation may indicate rheumatic disease.
Rheumatic disease, including rheumatoid arthritis and psoriatic arthritis, can involve inflammation of the:
- joints
- tendons
- muscles
- ligaments
As such, antirheumatic yoga is designed to soothe that inflammation and the autoimmune response that brings it on.
Through gentle, slow-paced movements, this series increases blood and oxygen flow to the areas affected by “too much wind,” whether rheumatic disease is present or not.
This makes the series good for a number of symptoms, including:
- stress and feeling overwhelmed
- nervousness and anxiety
- racing thoughts
- insomnia
I’ve personally used it to put myself back to sleep during bouts of insomnia. The gentle, calming movements won’t amp you up or get your heart rate too elevated in the middle of the night.
How to practice antirheumatic yoga
As a yoga teacher myself, I highly recommend learning the Antirheumatic Yoga Series from an experienced, trained teacher. If you aren’t able to find one familiar with the sequence, you may want to practice with the supervision of a physical therapist.
There are a number of free videos on YouTube, though the quality varies. You can also get access to the Pawanmuktasana series from reputable yoga video subscription providers, like Ekhart Yoga.
If you’re in good health and get approval from a doctor, it’s possible to practice the series on your own. It’s gentle enough for self-led practice if it isn’t your first foray into exercise.
At the very least, I still recommend following along with a video so you understand the movements before you begin.
Important notes before you practice
Always check with a medical professional before beginning a new exercise routine to ensure it’s right for you.
If you have neck, back, shoulder, or knee injuries, these poses may not be suitable for you. Ask your doctor or a seasoned teacher for modifications, and be sure to skip any poses that cause discomfort or pain.
The 16 poses of antirheumatic yoga
You’ll start the series seated in the base position with your legs flat on the floor and return to that position in between poses to rest and bring your attention to the breath and sensations in the body.
Yoga is both a physical practice and a mindfulness practice.
I suggest starting with 5 repetitions of each movement and building up to 10. Pro tip: Don’t forget to practice on both the right and left sides of the body.
It’s also a good idea to take your time through this series. It’s possible to do it in as short as 10 minutes if necessary, but you’ll get a lot more benefit from taking it slow and drawing out each pose — especially if your goal is to calm the mind.
Most of these poses can be practiced in a chair for anyone who finds it difficult to sit on the floor.
Base position
- Sit upright with your legs outstretched on your mat. Your feet can be about hips distance apart.
- Place your palms on the floor just behind your hips, with your fingers pointing toward your toes.
- Press your palms into your mat for additional support in keeping your spine straight.
1. Toe bending
- Start in base position using your arms to support yourself.
- With a straight spine, bring awareness to your toes.
- Curl your toes inward toward the soles of your feet, then stretch them backward toward your body. You can do one set of toes at a time, or both at the same time.
- Continue pointing and flexing your toes while the rest of your foot remains still.
- Rest when you’ve reached your desired number of repetitions.
2. Ankle bending
- From base position, bring awareness to your feet.
- Move your feet forward and backward from the ankle.
- Point and flex both feet repeatedly until you’ve reached your desired number of repetitions.
- Rest in base position.
3. Ankle rotation
- From base position, return the attention to your feet.
- Begin to rotate your feet in clockwise circles from your ankles.
- Repeat counterclockwise.
- Then, rotate each ankle in opposite directions at the same time.
- Reverse and rotate each ankle the other way.
- Rest in base position.
4. Ankle crank
- From base position, bend your right knee, placing your right ankle on your left thigh, a few inches from the knee. If there’s any strain in your knee, skip this pose.
- Extend your right ankle over the edge of your thigh to allow enough room for your ankle to rotate.
- Hold your right ankle with your right hand. Interlace your left fingers between your right toes.
- Supporting your ankle with your right hand, rotate your right foot in circles clockwise guided by your left fingers, then rotate counterclockwise.
- Continue for your desired number of repetitions. Repeat on both sides.
- Rest in base position.
5. Knee bending
- Start in base position.
- Bend your right knee and interlace your hands behind your right thigh, bringing your thigh in toward your chest.
- Supporting the weight of your right leg with your hands, slowly extend your leg until straight and a few inches off the floor.
- Then, bend your knee and draw your thigh close to your chest.
- Continue for your desired number of repetitions. Repeat on both sides.
- Rest in base position when finished.
6. Knee crank
- Start in base position.
- Bend your right knee and bring your thigh toward your chest.
- Interlock your hands behind your right thigh.
- Straighten your right leg as much as possible while keeping your spine straight and hands interlocked behind your thigh. You may want to lower your heel closer to the floor to allow this.
- Rotating from your knee, draw circles in the air with the lower half of your leg. The upper thigh stays as stationary as possible.
- Continue for a desired number of repetitions, then rotate in the other direction.
- Repeat on the other leg, and rest in the base position when finished.
7. Half butterfly
- Start in base position.
- Bend your right leg and place your right ankle on your left thigh, a few inches below the knee.
- Clasp the toes of your right foot with your left hand, and place your right hand on the bent right knee. If there is any strain in the knee, skip this pose.
- As you inhale, gently engage your right arm to lift your right knee toward your chest.
- Exhale as you gently use your right arm to press your knee downward toward the floor.
- Keep your spine and left leg straight as much as possible.
- Practice slowly and gently on each side.
- Rest in base position when done.
8. Hip rotation
- Start in base position.
- Bend your right knee and place your right foot on your left thigh.
- Cradle your right thigh in your arms with your knee bent and draw circles from your hip. Your foot and knee will move in a circular motion toward your chest, then away from your chest.
- Continue for the desired number of repetitions and repeat on the other side.
- End, resting in base position.
9. Full butterfly
- From base position, bend your knees and bring the soles of your feet together.
- Bring your heels in as close to your groin as possible, pressing your soles together.
- Clasp your feet with both hands.
- Using the strength of your legs, gently flap your knees up and down. Do not force the knees up or down.
- When you’ve completed the desired number of repetitions, come to a stationary butterfly position.
- Press the soles of your feet together and gently press your hands into your knees.
- Draw your knees downward with your hands, then allow them to spring upward without pushing.
- Repeat as many times as desired, then rest in base position.
10. Hand clenching
- From base position, extend your arms in front of your body, parallel with the floor.
- Face your palms downward, then open your hands as wide as possible.
- Then, bend your thumbs in and wrap your fingers around your thumbs.
- Squeeze your fists.
- Repeat as desired.
11. Wrist bending
- From base position, reach your arms out from your shoulders, parallel with the floor.
- Face your palms down with your fingers together.
- Slowly point your hands up toward the ceiling as far as they will comfortably go.
- Then, point your hands forward and down toward the floor.
- Keep your elbows straight and only bend at your wrists, not your fingers.
- Repeat as desired.
12. Wrist rotation
- From base position, extend your arms in front of your body, parallel with the floor.
- Make a loose fist with both hands with your thumb inside.
- Slowly rotate your fists in circles, bending at the wrist.
- Keep your elbows straight.
- Repeat in both directions. You can also try rotating each wrist in opposite directions for an added challenge!
- Repeat in the opposite direction.
- Finish in base position.
13. Elbow bending
- From base position, reach your arms forward from your shoulders, palms up.
- Bend at your elbows and touch your fingertips to the tops of your shoulders.
- Keep your upper arms parallel to the floor as your elbows bend.
- Slowly reach your arms out again, straightening your elbows.
- Repeat as desired.
- Then, extend your arms out to the sides, parallel to the floor.
- Repeat the extension and flexion to the sides of your body rather than the front.
- After the desired amount of repetitions, rest in base position.
14. Elbow rotation
- From base position, reach your right arm forward from your shoulders, palm up.
- Bend your right elbow in and touch the top of your shoulder.
- Support your right elbow with your left hand.
- Draw circles in the air with your right elbow.
- Complete the desired number of repetitions before repeating in a counterclockwise direction.
- Repeat on the other side.
- Rest in base position.
15. Shoulder socket rotation
- From base position, bring the fingertips of each hand together to form a point. I like to think of this as the fingertips “kissing.” (In Sanskrit, this type of movement is called a “mudra” which means “gesture.”)
- Place the fingertips of your right hand on your right shoulder and your left fingertips on your left shoulder.
- Rotate your elbows in circles, keeping your fingertips “glued” to your shoulders.
- Keep your head and torso stationary.
- After the desired number of repetitions, rotate your elbows in the opposite direction.
- Rest in base position.
16. Neck rotations
- From base position, exhale and slowly draw your chin downward toward your chest.
- Inhale and slowly draw your chin upward, dropping your head backward as far as is comfortable.
- Repeat for the desired number of repetitions.
- Return to base position, then slowly exhale and move your head to the right as if looking over your right shoulder.
- Inhale to center, then exhale to the left.
- Keep your shoulders relaxed. Return to base position after the desired number of repetitions.
- On the exhale, slowly release your right ear toward your right shoulder.
- Keep your shoulder relaxed away from your ear.
- Inhale as your head moves back to center, and exhale as your left ear descends toward your left shoulder.
- Repeat as desired.
- Finally, bring your chin toward your chest.
- Then, rotate your right ear toward your right shoulder, bringing your head back with your chin extended toward the sky.
- Rotate your left ear to your left shoulder, returning to the initial position with your chin toward your chest.
- Repeat as desired.
The takeaway
The Antirheumatic Yoga or Pawanmuktasana Series 1 may not be the sexiest or most Instagrammable sequence out there. Still, it’s one of my go-to practices that I plan to continue as I age.
While some other poses look more impressive, these simple little movements pack a huge punch for mobility and mindfulness.
I sincerely hope they bring you relief from excess wind — however that shows up for you!
Medically reviewed on March 27, 2024
Like the story? React, bookmark, or share below:
Have thoughts or suggestions about this article? Email us at article-feedback@bezzy.com.
About the author